How To Create Your First Story Post
You've set up your Storrito account and are ready to create your first content? Use this guide to go from idea to scheduled Instagram Story!
1) Create or upload your first Story
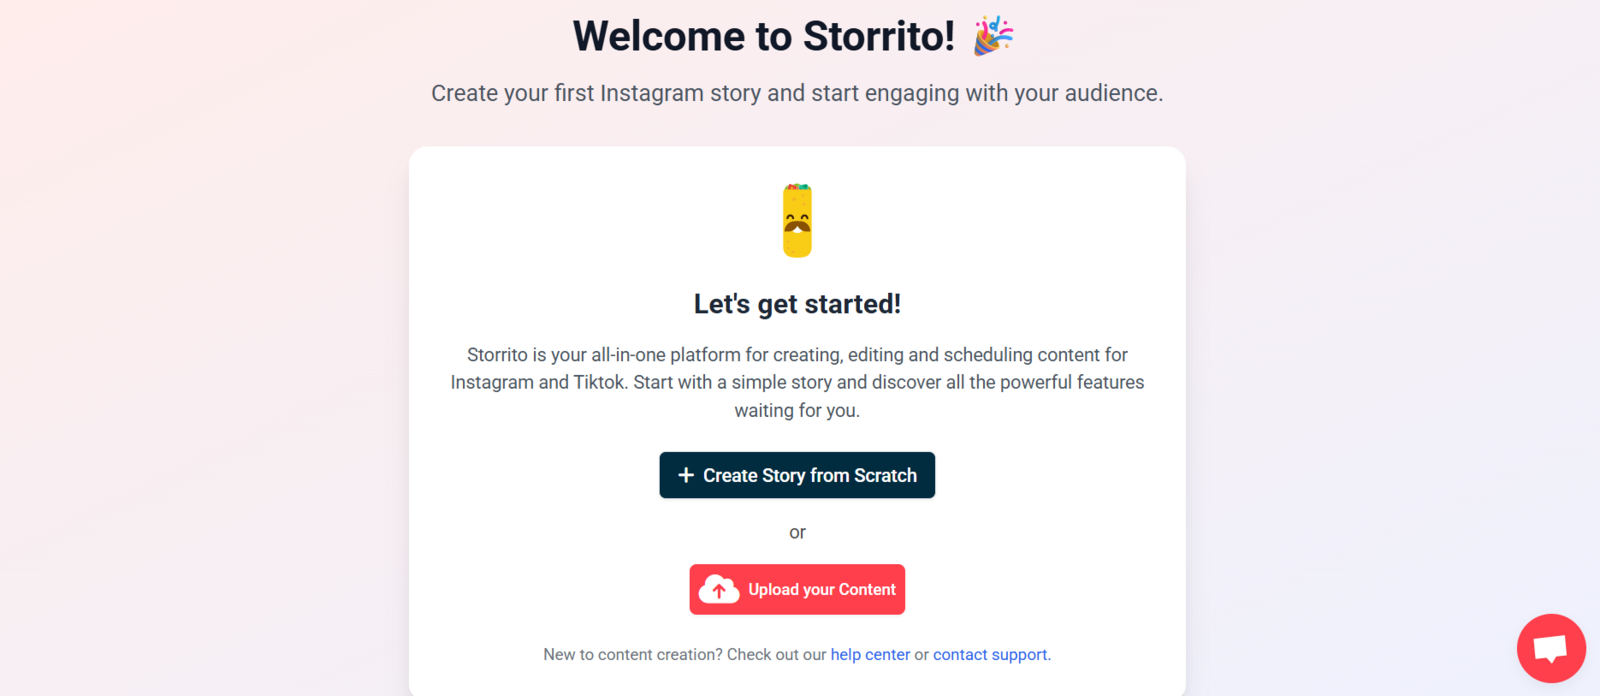
- On the welcome screen choose Create Story from Scratch or Upload your Content
- If you create a Story from scratch, you'll enter the editor with a blank vertical canvas
- If you upload your content, you'll see your pre-prepared Story content
You can start a new Story at any time from the Gallery too, using the Upload image(s) or video(s) and New empty story buttons at the top of the page.
2) Build your Story in the Editor
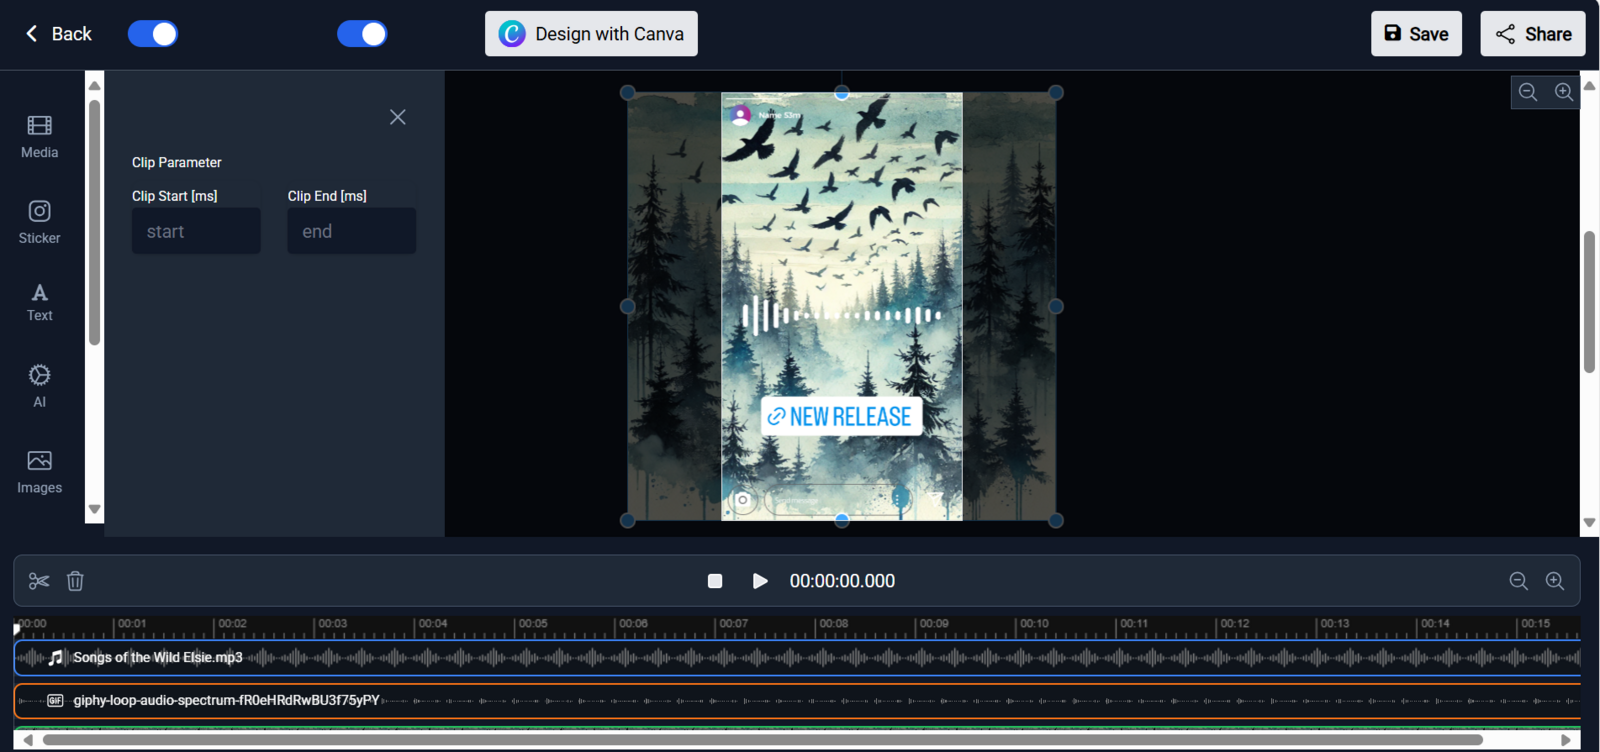
Toggle the IG Story overlay and the snapping tool on and off, depending on your design needs!
Story assets:
- Media: add photos, videos, and GIFs
- Sticker: add the link sticker, hashtags, mentions, polls, countdowns, and more
- Text: add and style text
- AI: generate AI images using Blackforest or Dall-E
- Images: use a free image from Unsplash
- GIF: add a GIF or sticker
- Emojis: add an emoji
- Background: alter the background color of your Story slide
For step-by-step guides to each sticker type, see Interactive Stickers For Instagram Stories.
Timeline & layers:
- Each asset (video, GIF, audio, sticker, text) appears as a layer underneath your Story canvas
- Drag the ends to trim
- Drag the track to change timing
- For audio, set Clip Start / End (ms) to trim precisely
Tip: Select the Design with Canva button to link your Canva account and use your designs!
3) Save your Story to the Gallery
Click Save to store your finished Story in the Gallery. Everything you save lives there, ready to schedule whenever you are.
4) Open your Story and choose Social schedule
- Go to the Gallery in the left menu
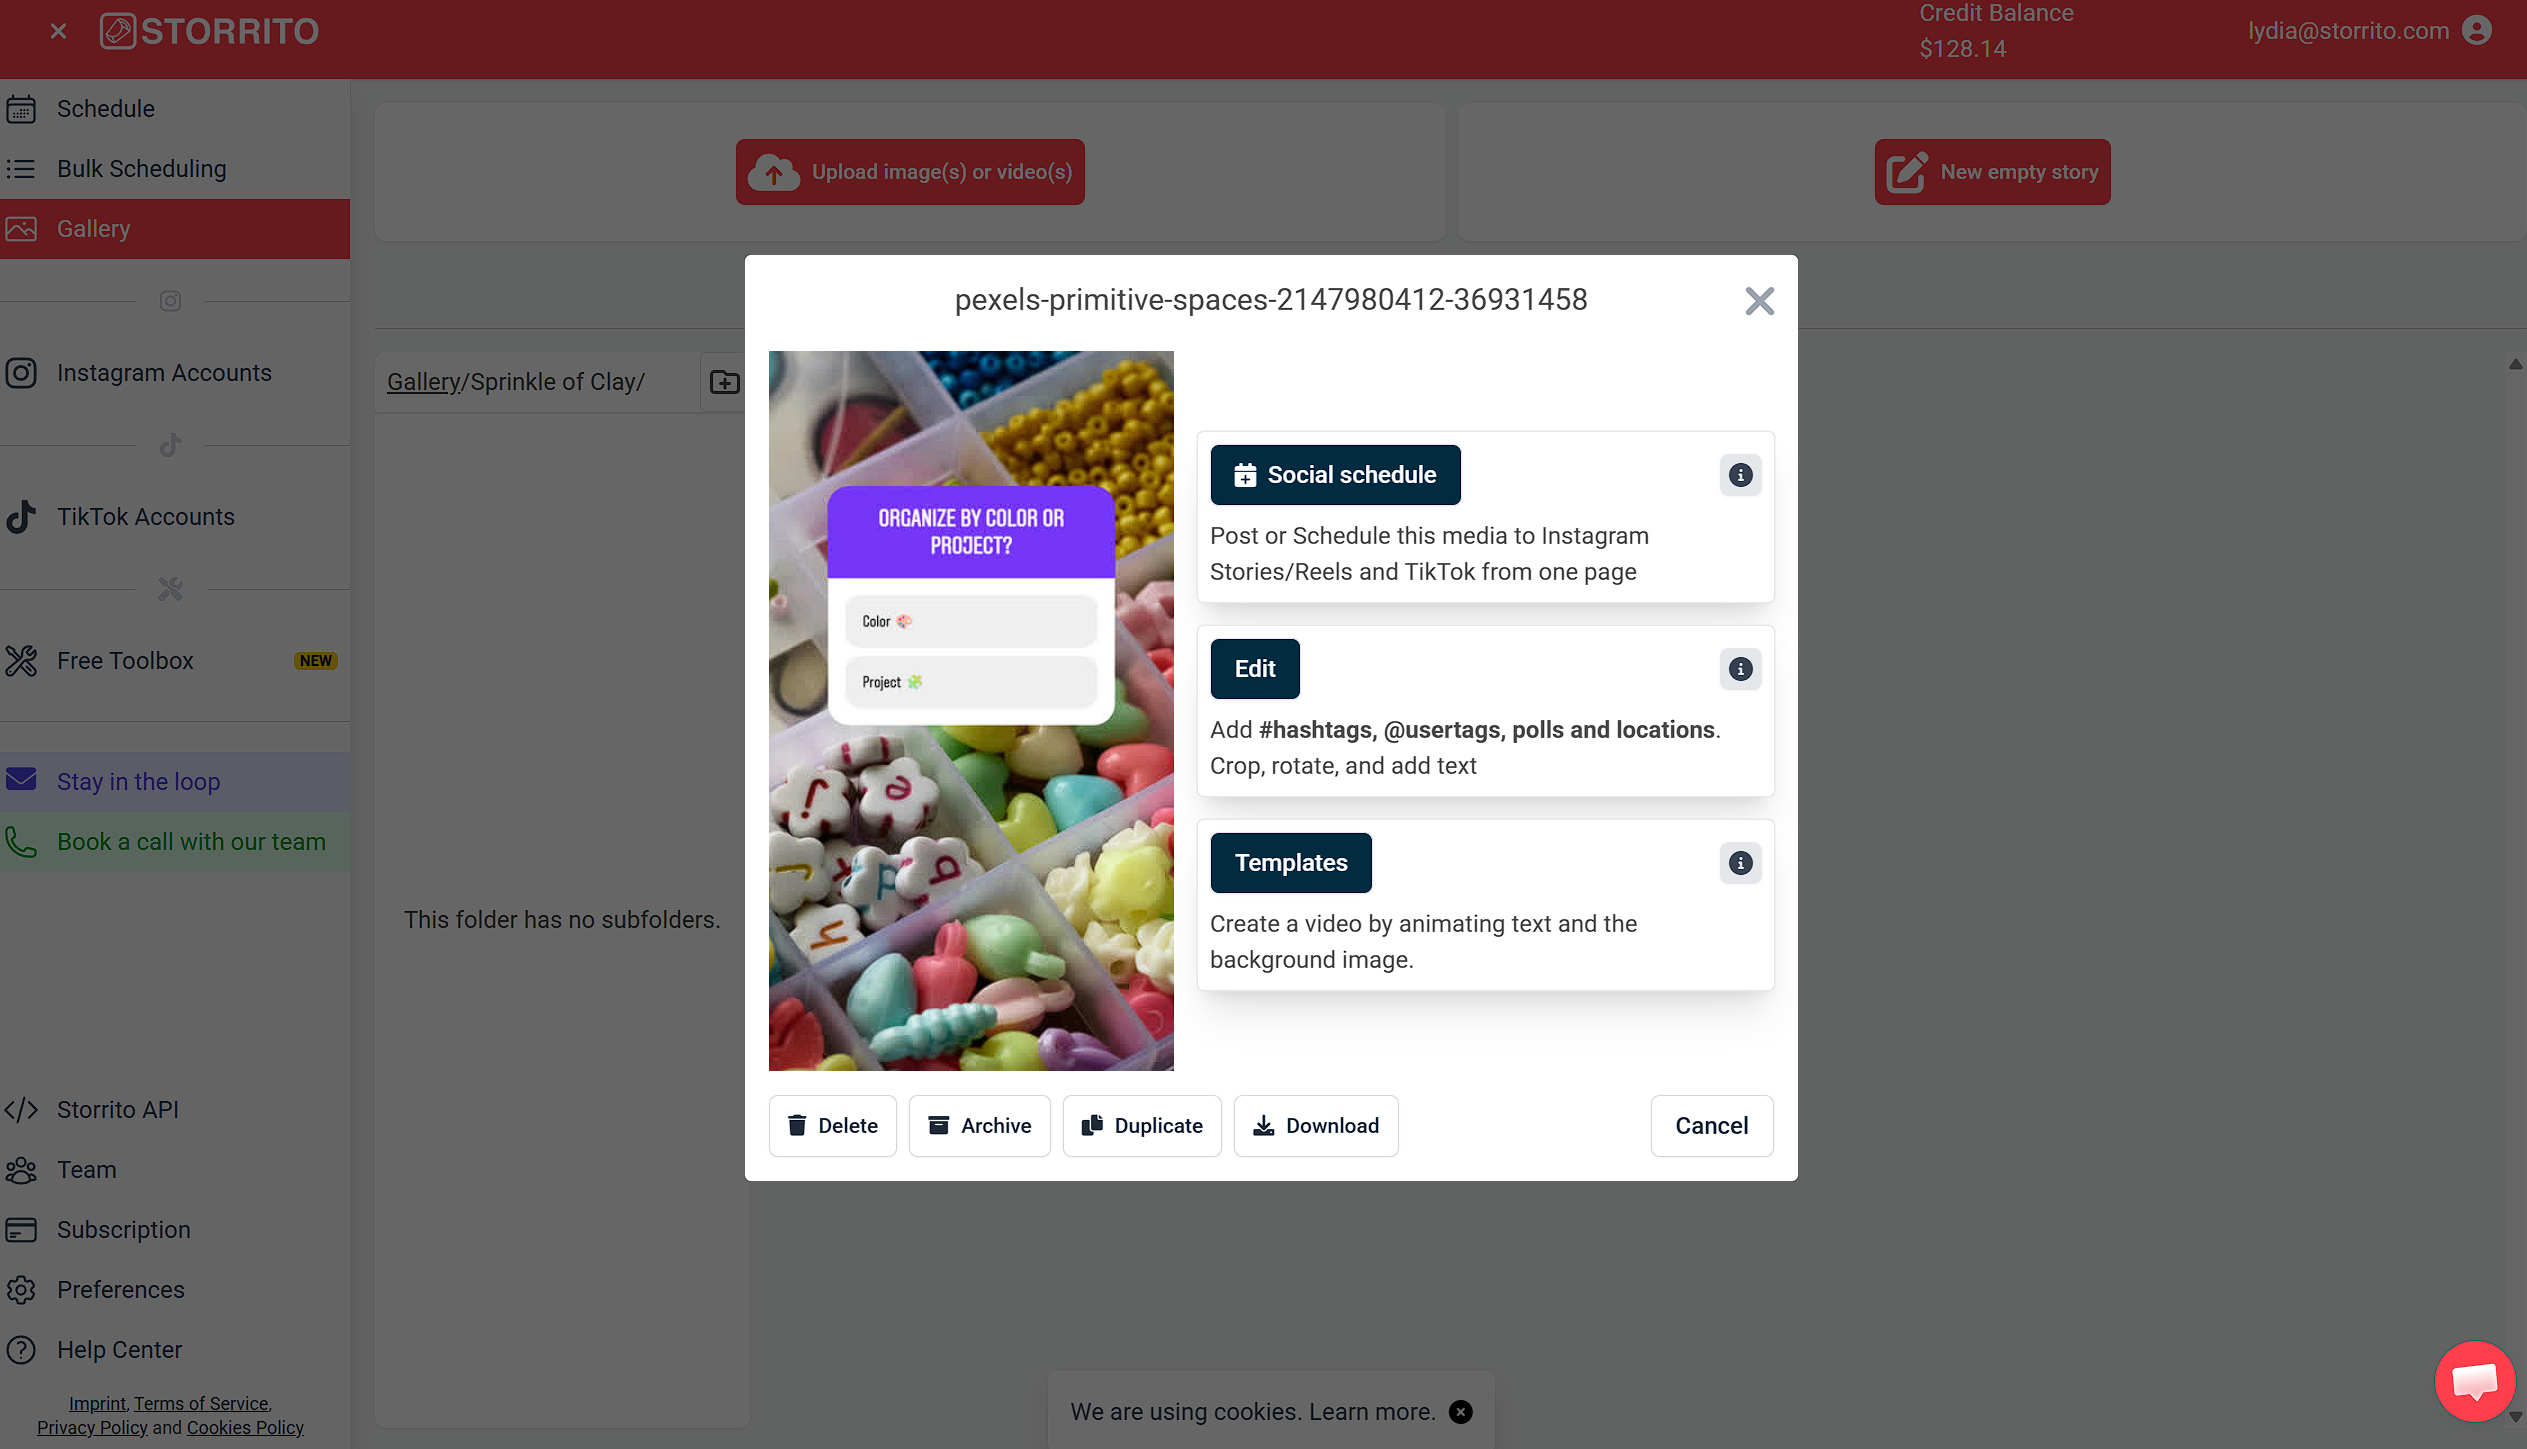
- Click your saved Story to open its actions
- Choose Social schedule to post or schedule the same media to Instagram Stories, Instagram Reels, TikTok, and YouTube Shorts from one page
The same window also lets you Edit the Story, turn it into a video with Templates, or Duplicate, Download, Archive, and Delete it.
You can also skip the Gallery: from the editor, click Share in the top right and choose Schedule story in the Share Your Story panel. Storrito saves the design and opens the same scheduling page.
5) Choose your destinations and options
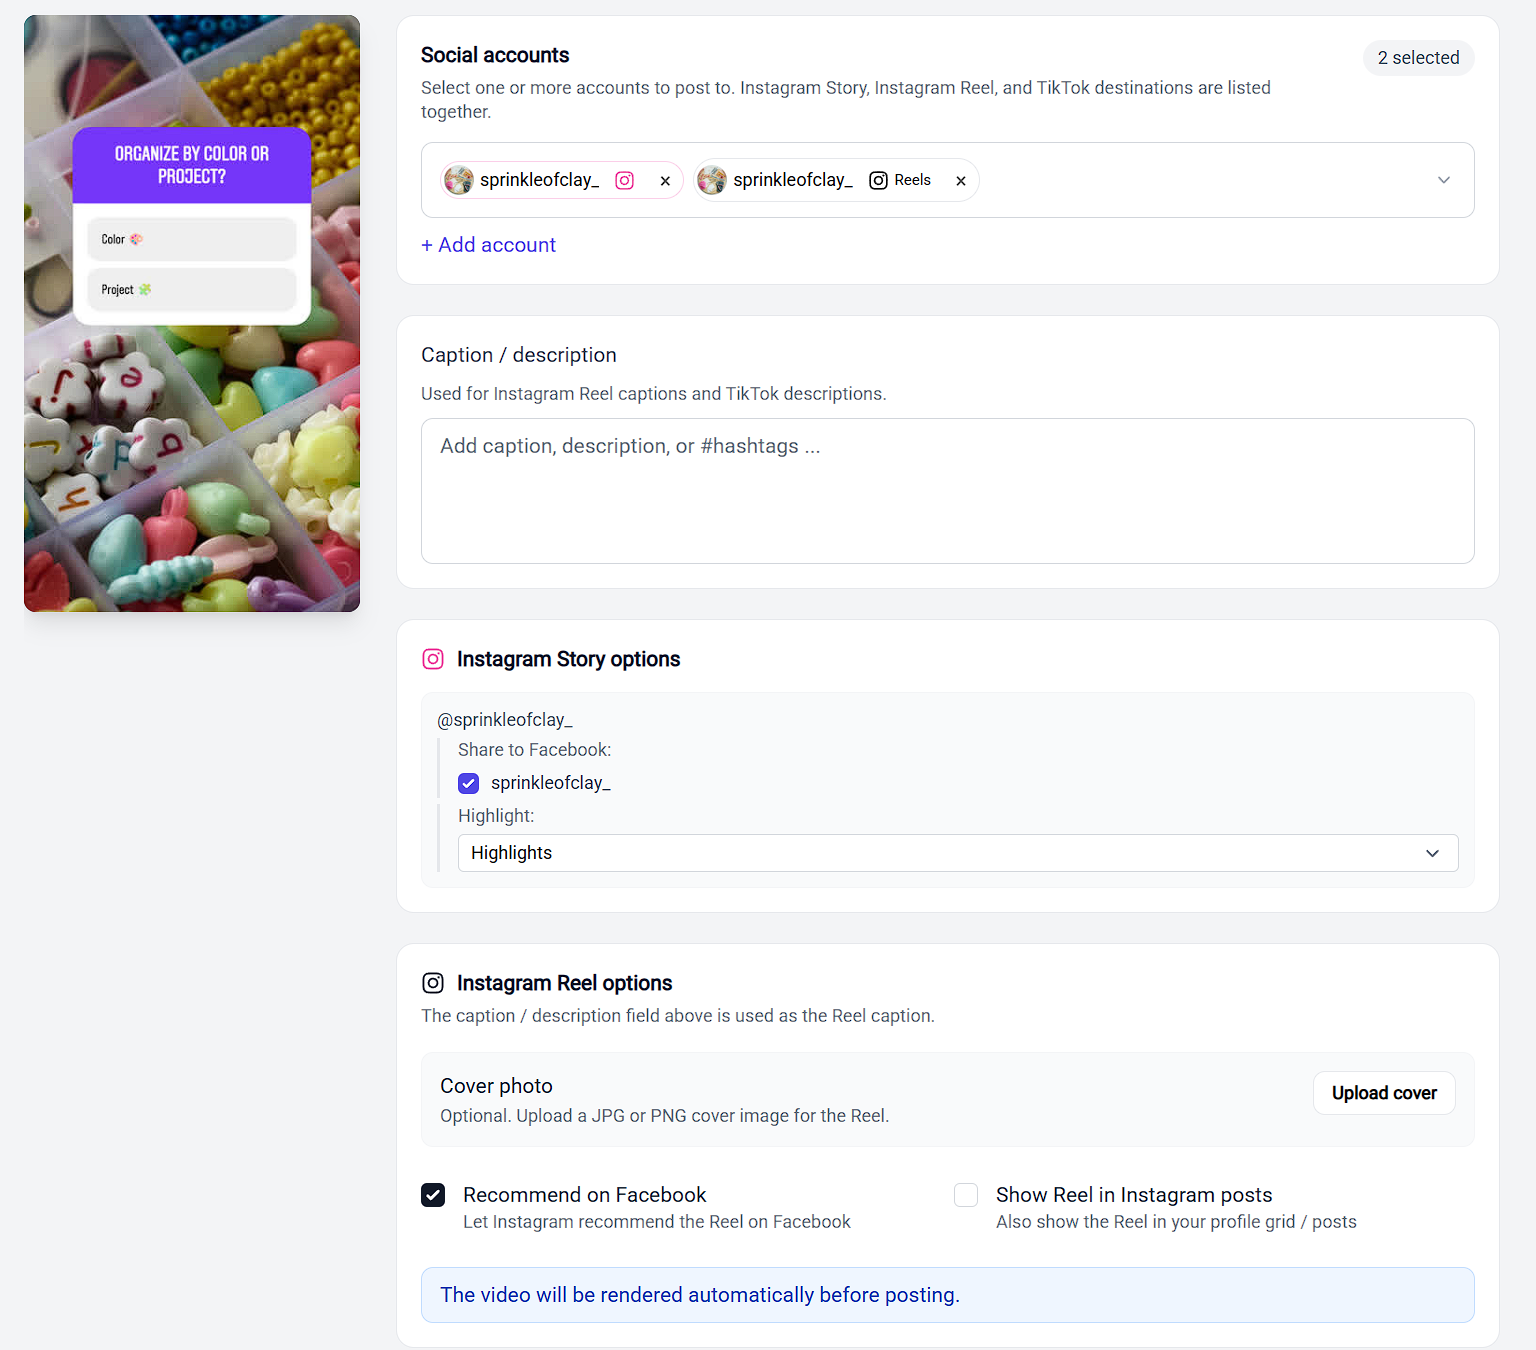
- Under Social accounts, select one or more accounts to post to. Instagram Story, Instagram Reel, TikTok, and YouTube destinations are listed together, so you can publish everywhere from a single page. Use Connect account at the bottom of the list if you still need to add one
- Add a Caption / description. This is used for Instagram Reel captions, TikTok descriptions, and YouTube Short descriptions. Instagram Stories don't use it
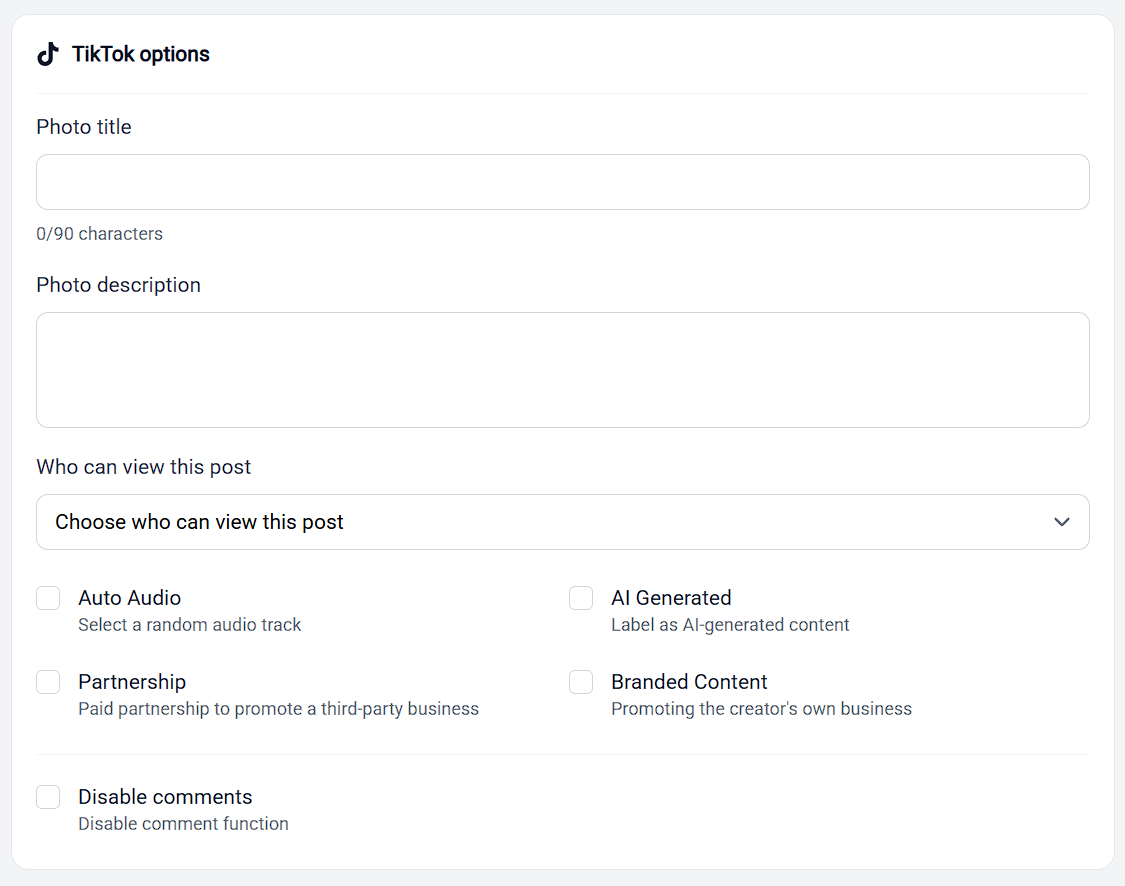
- Each destination you select shows its own options:
- Instagram Story options: add a first comment, share the Story to a connected Facebook page, and pick a Highlight album to save it to
- Instagram Reel options: add an optional cover photo, let Instagram recommend the Reel on Facebook, or show the Reel in your profile grid. The video is rendered automatically before posting
- TikTok options: set a photo title and description, choose who can view the post (required), and toggle settings like Auto Audio, AI-generated labeling, partnership or branded content, and comments
- YouTube options: set the Short's title and visibility, and flag it as made for kids or altered/synthetic media if that applies
6) Set the time and schedule
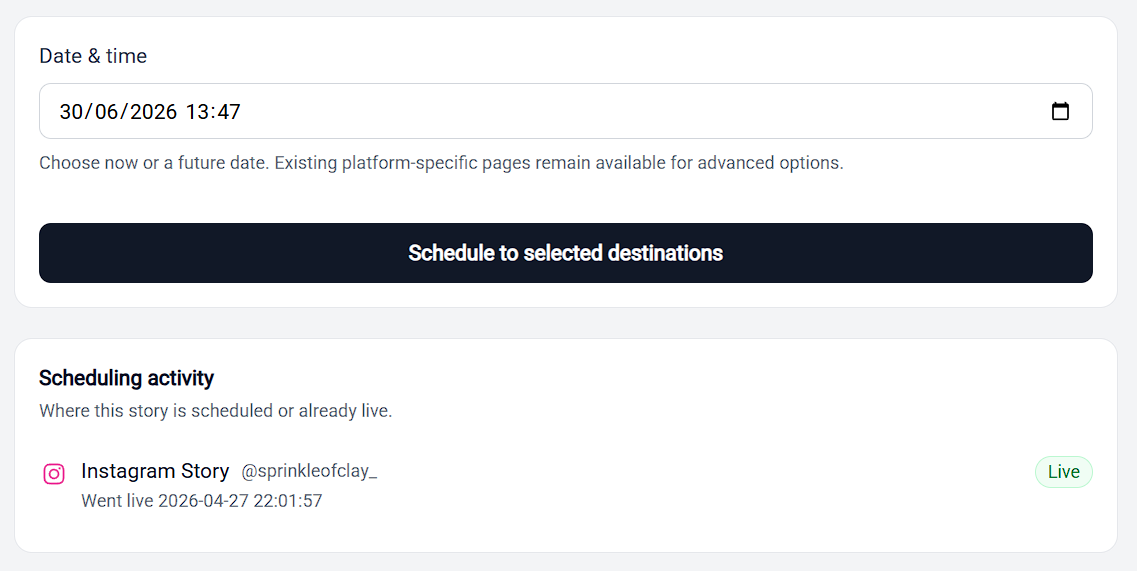
- Under Date & time, leave the date untouched to publish straight away, or set a future date and time to schedule
- Double-check that the time matches your local timezone
- Click the button underneath. It reads Post now while the date is untouched, and Schedule to selected destination(s) once you have changed it
The button stays inactive until you have picked at least one destination, so select your accounts first.
7) Track scheduled posts
- The Scheduling activity panel on the same page lists each destination separately and shows its status: Scheduled, In progress, Live, or Failed. YouTube adds a Processing step while YouTube handles the upload
- Posted Stories later show as Expired, which just means the Story has run its 24 hours on Instagram
- A Cancel link sits next to each destination while it is still scheduled
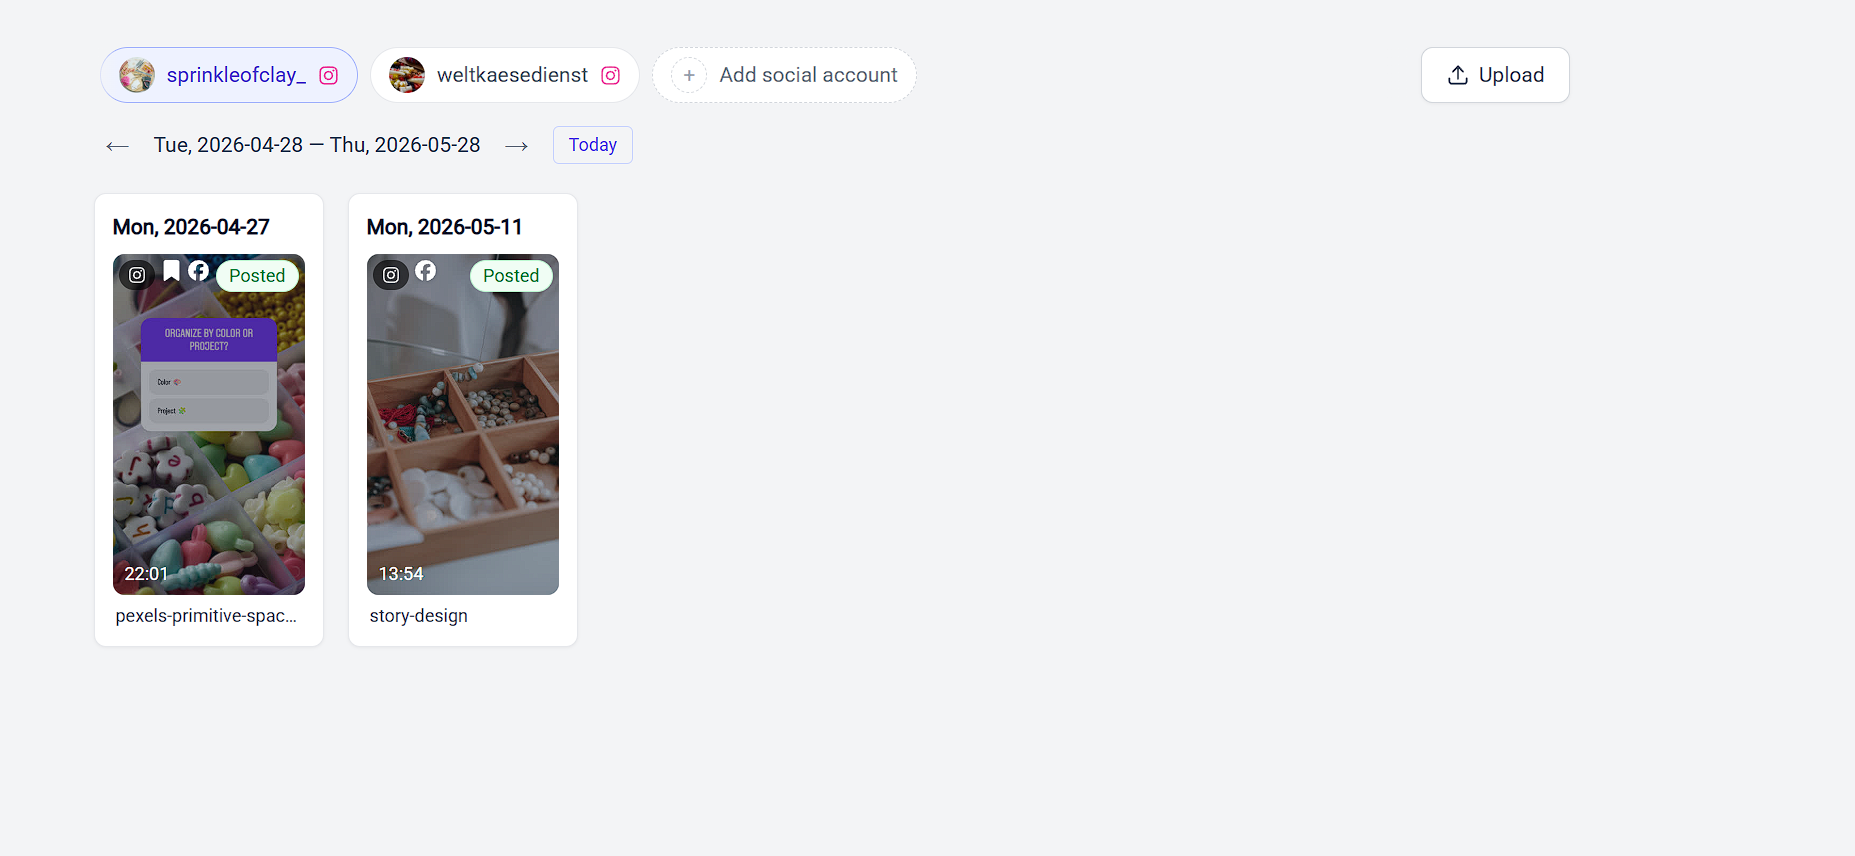
- For a full overview, open the Schedule view in the left menu
- Filter by account using the account selector at the top, which opens a search box with your accounts grouped by platform. Add social account sits at the bottom of that list
- Move through time with the date-range arrows, or jump back to the current month with Today
- Each post appears as a card showing its destination icons, time, and status (for example Posted)
- Click a post to reschedule or cancel it
8) Organize content in the Gallery
- Go to the Storrito Gallery
- Add folders from the folder panel on the left to group your assets
- Move media in by dragging it onto a folder, or by ticking items and using Move in the bar along the bottom
- Click on your assets to manage them: social schedule, edit, duplicate, and more!
- To delete a whole folder, right click on the folder name and select Delete
Tip: Duplicate your base designs and save them in a separate folder to use as templates, so you can update them quickly for new campaigns!
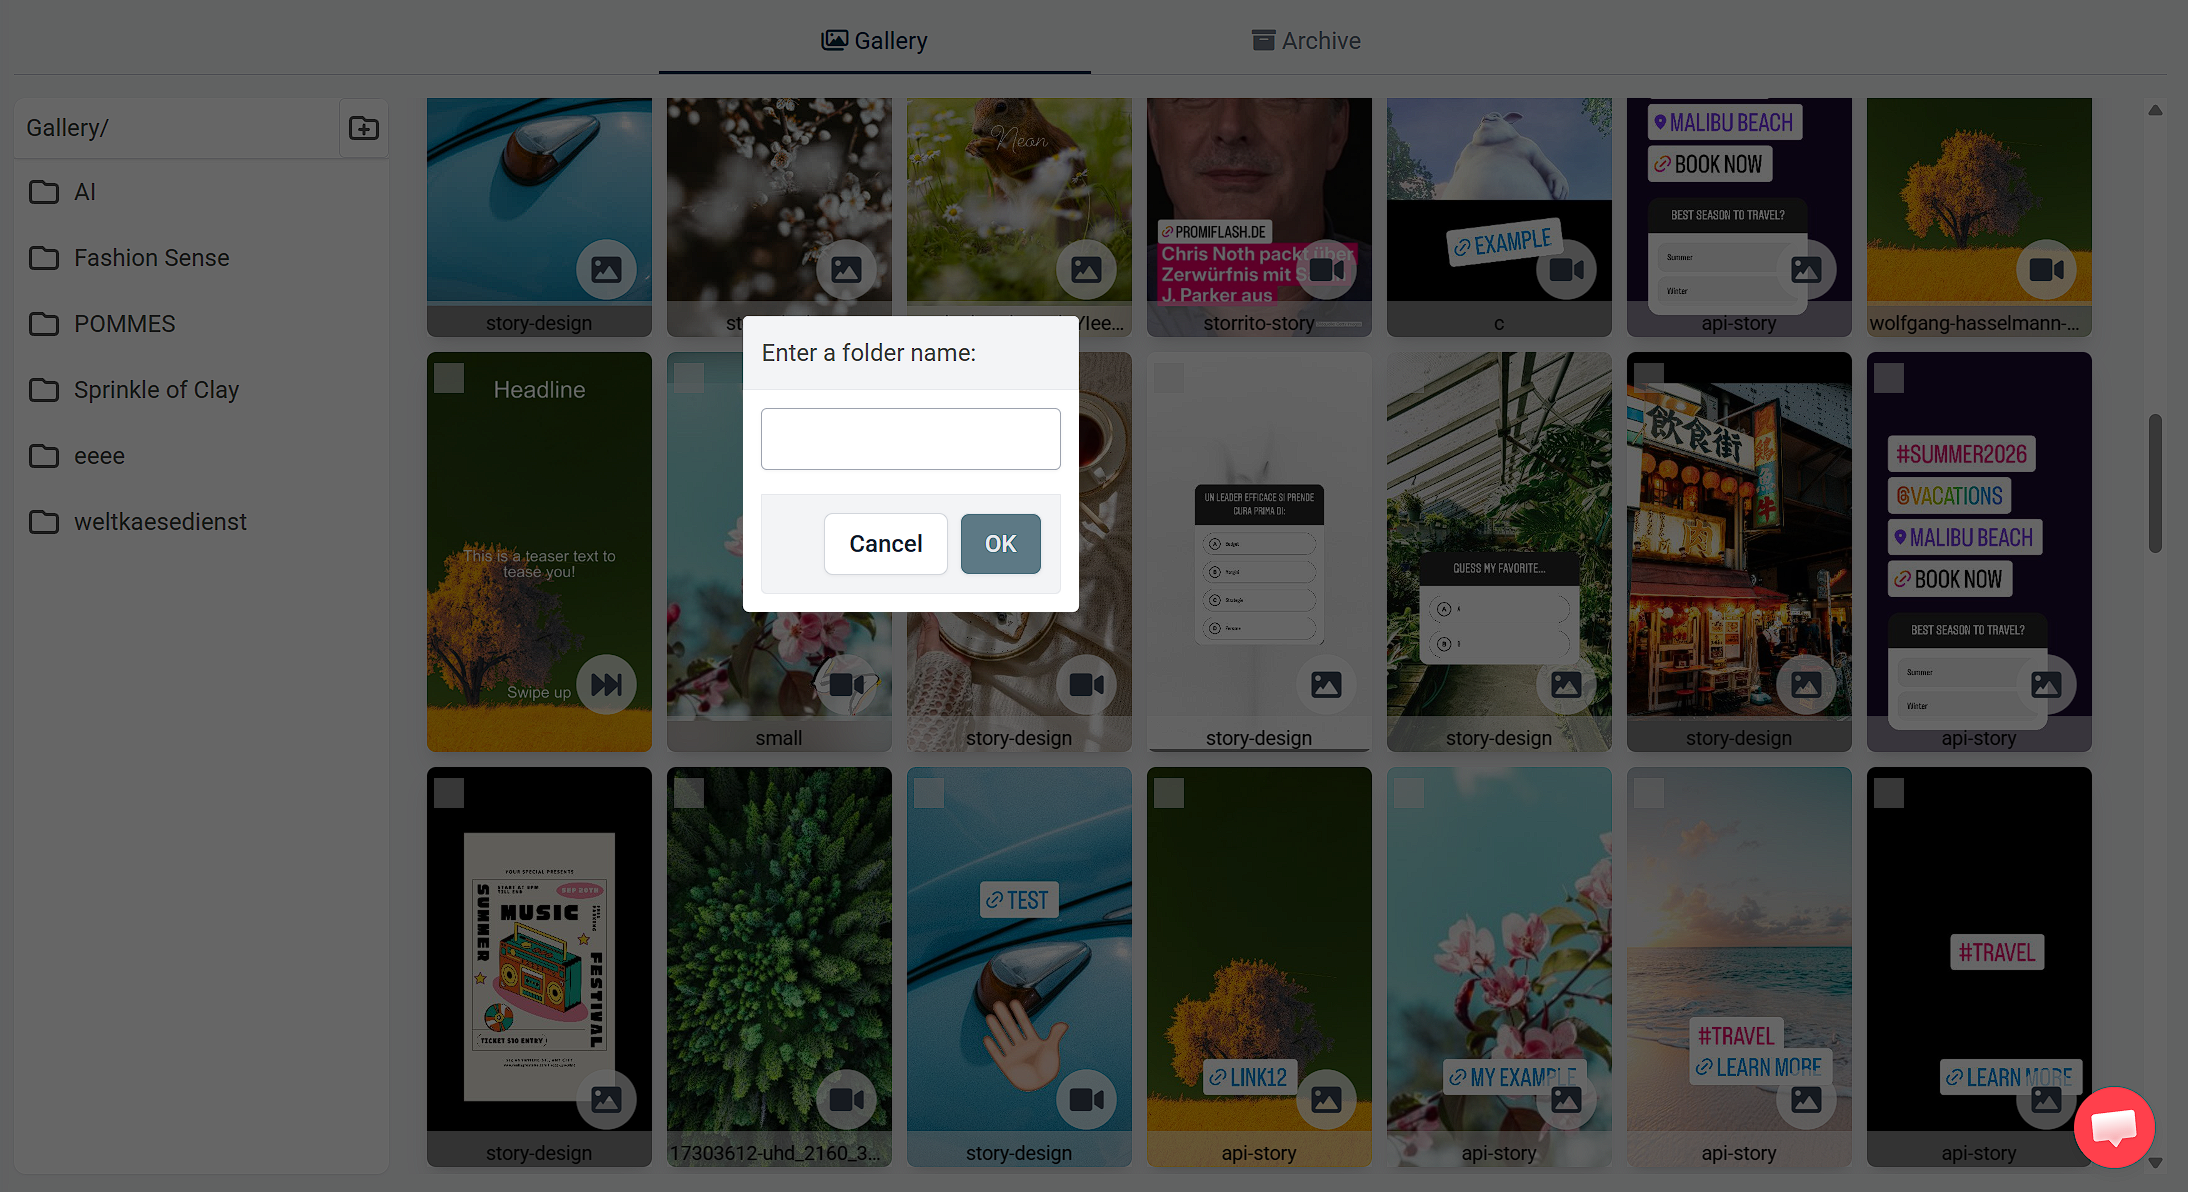
For more on folders, the Archive, and scheduling straight from the Gallery, see How To Organize Your Gallery With Folders.
Troubleshooting
- Button greyed out? Select at least one destination under Social accounts first, then Schedule to selected destinations becomes active
- Can't schedule? You need a connected account and available credits in your wallet. Scheduled posts also need a positive credit balance at the moment they are due to publish, not just when you schedule them
- Posted immediately when you meant to schedule? The date field decides. If it is left untouched the button reads Post now
- Time off by an hour? Confirm the date and time match your timezone
Platform-specific guides
Each destination has its own options card. For the detail on each one:
- How Scheduling Works In Storrito — the rules shared by every platform
- How To Schedule Instagram Stories And Reels
- TikTok Integration
- How To Schedule YouTube Shorts
Questions? We love to hear them! Get in touch via the support chat or send us an email: support@storrito.com
Tools
- Subtitle overlay
- Auto Post Instagram Stories
- How to Upload a Video to Instagram Story from PC
- Schedule Instagram Stories with the Link Sticker
- Instagram bio generator
- Upload and post Instagram Reels from PC
- Subtitle generator
- Instagram grid maker
- Schedule Instagram Stories
- Turn an MP3 into an Instagram Story video
- Can you schedule Instagram stories? Yes, with Storrito.com! (Here's How)
- Instagram Story bingo generator
- Storrito toolbox
- Instagram Story Planner (Scheduler)
- Instagram font generator
- Instagram Story 'this or that' generator
- Schedule Facebook Stories from PC
- Instagram Story Maker Online
- Trim a video
- Instagram carousel maker
- PDF to Instagram carousel
- How to schedule Instagram Reels
- How to add a story in Instagram from PC or Mac?
- Post Instagram Stories from PC
- Instagram Story tier list generator